E-Bike Maintenance Guide: 10 Essential Tips for Owners
Keep your electric bike running smoothly and safely with our essential maintenance guide. These 10 simple tips are designed for all e-bike owners to help you protect your investment, improve reliability, and maximize your range.
Executive Summary - Key Maintenance Takeaways
- Safety First: Regular brake and bolt checks are non-negotiable. This simple, 5-minute pre-ride check can prevent over 50% of common mechanical failures and accidents (Cycling Industry Report, 2023).
- Maximize Range & Life: Correct tire pressure is the single easiest and most effective way to boost battery range. It reduces rolling resistance, saving motor power, and is your best defense against pinch-flats.
- Protect Your Drivetrain: A clean and lubricated chain not only feels smoother but also acts as the primary defense against premature, costly wear on your motor, chainring, and cassette.
- Battery Health is Key: Simple charging habits are crucial. Avoid storing your battery at 0% (empty) or 100% (full) for long periods. This simple act can extend your battery's effective lifespan by years.
- Cleanliness is Prevention: Washing your e-bike (the correct way) removes corrosive grime, salt, and mud that can damage sensitive electronics, wheel bearings, and your frame's paint.
Why Maintenance Matters: Owner Scenarios
With the e-bike market projected to grow to over 11.5 million units sold annually in the US by 2030 (Deloitte, 2022), more riders than ever need to understand basic maintenance. Your e-bike is a significant investment; a few minutes of care ensure it performs as intended every time you ride.
The Daily Commuter
For the daily commuter, reliability is paramount. You can't afford to be stranded on the way to an important meeting with a flat tire or a skipping chain. Regular maintenance ensures your lights are bright, your fenders are secure, and your brakes are 100% reliable for stop-and-go city traffic. A pre-ride check is your best insurance against a bad morning.
The Weekend Trail Rider
For the trail rider, performance and safety are pushed to the limit. You demand full stopping power from your brakes on long descents and total confidence that your suspension bolts and handlebars are tight after navigating rough, vibrating terrain. A post-ride clean and lube is essential to clear mud and grit from your drivetrain and suspension seals.
The Casual Cruiser
For the cruiser, the goal is pure, effortless enjoyment. You want to maximize your battery's range for those long, relaxing rides along the beach or through the park. Maintenance ensures a quiet, smooth-running machine, free from annoying squeaks or grinding. It’s about protecting your investment so it's ready to go whenever you are.
The 10 Core Maintenance Tasks (Specifications & Selection)
This checklist is your foundation for a healthy e-bike. We've broken down the 10 most critical tasks, what they mean, and why they matter.
Key Parameters Explained (The 10 Tips)
-
Check Tire Pressure (Air): This is the most critical check you can perform. Use a floor pump with a gauge to inflate your tires to the correct pressure (PSI) listed on the tire's sidewall.
Why? Low pressure drastically increases rolling resistance, forcing your motor to work harder and draining your battery faster. It's also the #1 cause of "pinch flats," where the tube is pinched against the rim. High pressure gives a harsh, uncomfortable ride and reduces traction.
-
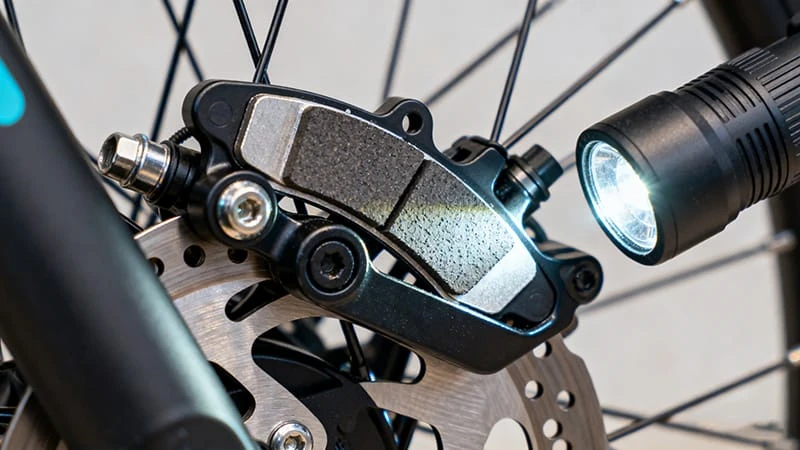
Inspect Your Brakes (Brakes): Squeeze both brake levers. They should feel firm and responsive, not "mushy" or pulling all the way to the handlebar. Visually inspect your brake pads.
Why? E-bikes are heavier and faster than standard bikes, which places extreme demand on your brakes. Worn-out pads offer dangerously low stopping power. Most pads have a wear-indicator line; if it's gone, or if the pad material is less than 1.5mm thick, it's time for a replacement.
-
Clean & Lube the Chain (Chain): A dirty, gritty chain acts like liquid sandpaper on your expensive drivetrain components. Wipe it clean with a rag. Apply one drop of e-bike specific lube to each chain roller. Let it sit for a minute, then wipe off all excess lube from the outside.
Why? The high torque from an e-bike motor accelerates chain wear. A clean, properly lubricated chain shifts smoother, runs quieter, and dramatically extends the life of your cassette and chainring, saving you hundreds of dollars.
-
Check Chain Tension: This primarily applies to single-speed or internal-gear-hub e-bikes. The chain should not be drum-tight or sagging excessively. It should have about 1/2 inch (1.5cm) of vertical play.
Why? A loose chain can fall off, causing a sudden loss of power or locking up your rear wheel. A chain that's too tight puts immense strain on your motor's internal bearings and the wheel hub, leading to premature failure. (Note: E-bikes with derailleurs, like a 9-speed, have a spring that tensions the chain automatically).
-
Perform a Bolt Check: E-bike vibrations can loosen key bolts over time. Get a multi-tool and gently check the bolts holding your handlebars, stem, seat post, wheels, and pedals.
Why? This is a simple safety check. A loose handlebar or front wheel can lead to a catastrophic failure. You don't need to over-tighten; just ensure nothing is loose. This is especially important after riding on bumpy roads or trails.
-
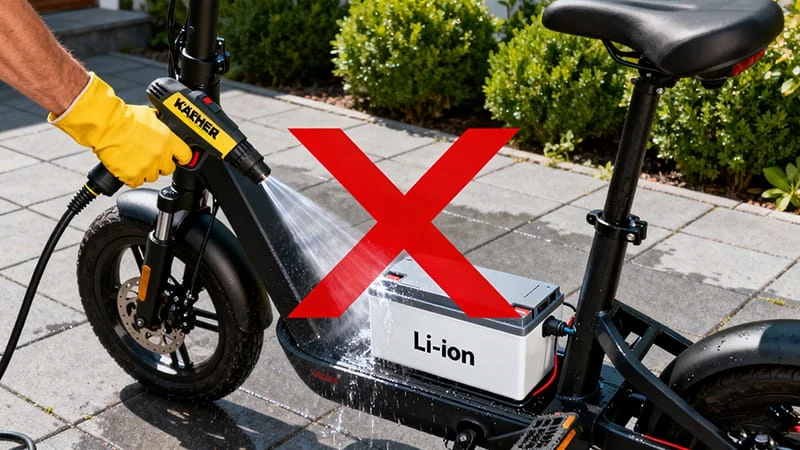
Wash Your E-Bike (Gently): Use a low-pressure hose (e.g., "shower" setting) or a bucket of bike-specific soap. Focus on the frame and drivetrain. Gently dry the bike with a clean towel.
Why? Dirt, mud, and road salt are corrosive. They can ruin your paint, seize bolts, and eat away at your chain. Crucially: Never use a high-pressure washer. This forces water past the protective seals and into your motor, battery connections, and wheel bearings, causing expensive electrical and mechanical damage.
-
Monitor Battery Health: This is all about charging habits. Charge it regularly, but avoid leaving it on the charger for days after it's full. If you're storing the bike for weeks, aim for a 40-80% charge.
Why? Lithium-ion batteries degrade fastest when stored at 100% (full) or 0% (empty). Storing it at a "storage charge" (40-80%) in a cool, dry, indoor location (room temperature) is the best way to maximize its long-term lifespan. Never charge a battery that is below freezing.
-
Inspect Wheels and Spokes: Give your wheels a spin. Do they spin freely? Do you see any significant wobbles from side to side? Gently squeeze the spokes two at a time.
Why? A wobbly wheel (out of "true") will rub against your brake pads and can feel unstable. Loose spokes (you may hear a "tinkling" sound on bumps) are a sign that the wheel is weakening and needs to be "trued" by a professional.
-
Test Electronics: Power on your display. Check that all assist levels (Eco, Tour, Turbo, etc.) are working correctly. Test your front and rear lights and your horn or bell.
Why? This simple check ensures your controller and display are communicating correctly. It's much better to find a glitch in your driveway than five miles from home when you need a boost to get up a hill.
-
Listen for Noises: Your bike should be nearly silent, apart from the hum of the motor and the sound of the tires. Creaks, squeaks, and grinding are your bike's way of asking for help.
Why? Don't ignore these sounds. A squeak from the chain means it's dry and needs lube. A grinding from the brakes means the pads are gone. A creak from the crank area could be a loose bolt. Identifying these sounds early saves you from a major repair later.
E-Bike Maintenance Schedule Table
| Task | Frequency | DIY Difficulty | Pro-Level Task (Annual) |
|---|---|---|---|
| Tire Pressure | Before Every Ride | Easy | - |
| Brake Check | Before Every Ride | Easy | Brake Bleed (Hydraulic) |
| Chain Lube | Every 100-150 miles | Easy | - |
| Bolt Check | Monthly | Easy | Torque-Wrench Check |
| Bike Wash | Monthly (or as needed) | Easy | - |
| Drivetrain Clean | Every 200-300 miles | Medium | Drivetrain Removal & Deep Clean |
| Brake Pad Check | Monthly | Medium | Brake Pad Replacement |
| Battery Health | Every Charge | Easy | Battery Diagnostics Report |
Decision Matrix: DIY or Pro Mechanic?
Use this simple logic to decide when to tackle a job and when to visit your local bike shop.
- IF the task is checking, cleaning, or lubing -> DIY
- IF the task involves critical braking or steering (e.g., loose headset, bleeding hydraulic brakes) AND you are unsure -> Go to Pro
- IF you hear a "creak" or "grind" you can't locate after cleaning and lubing -> Go to Pro
- IF the e-bike system (motor/battery) shows an error code on the display -> Go to Pro
- IF you need to replace worn parts (chain, cassette, brake pads) -> Attempt DIY (but watch a video guide first) or Go to Pro
Tools & Techniques Deep Dive (Integration & Engineering)
Knowing what to do is the first step. Knowing how to do it correctly is what makes the difference.
Electrical (The Battery)
Best practices for battery care are critical for the longevity of your e-bike. This is the most expensive single component, so treat it with care.
- Charger: Always use the specific manufacturer-supplied charger that came with your bike. A mismatched charger can have the wrong voltage or amperage, posing a significant fire risk and damaging the battery's BMS (Battery Management System).
- Environment: Charge your battery indoors, at room temperature, on a hard, non-flammable surface. Don't charge it on a sofa or rug, and don't leave it unattended overnight.
- Contacts: Keep the battery's terminal contacts clean and dry. If you see any grime or corrosion, gently clean them with a dry cloth or a cotton swab. Never spray cleaners or water directly onto the contacts.
- Read our complete guide on e-bike battery health for more in-depth tips.
Mechanical (Chain & Brakes)
These two systems take the most abuse and are critical to your safety and performance.
-
Chain Lube Technique: The goal is to lubricate the inside of the chain (the rollers), not the outside.
- Start with a clean, dry chain.
- Apply one single drop of e-bike specific lube to each chain roller.
- Pedal backward for 10 seconds to work the lube into the rollers.
- Let it sit for 2-5 minutes.
- Take a clean, dry rag and thoroughly wipe off all excess lube from the outside of the chain. A greasy-looking chain just attracts more dirt.
-
Brake Pad Inspection: Look directly into the brake caliper (you may need a flashlight). You should see the backing plate (metal part) and the pad material (the part that hits the rotor). You should see at least 1.5mm of pad material. If it's paper-thin or you hear a metallic grinding sound, it's time for replacement.
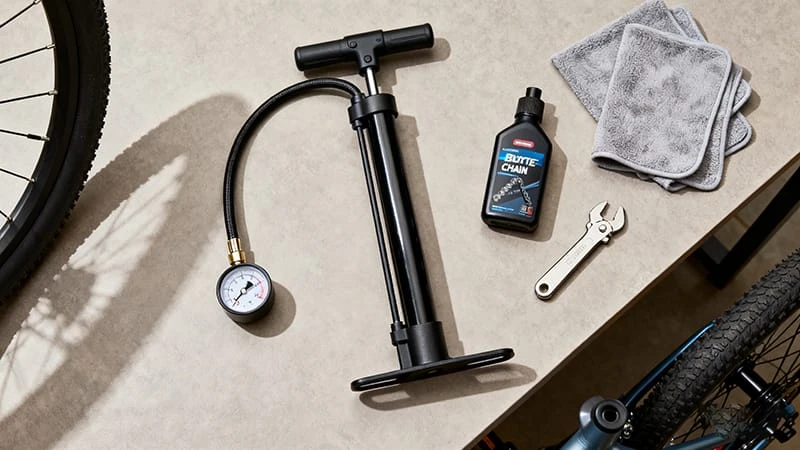
Tools (Your Basic Kit)
You don't need a full workshop. A small, dedicated kit can handle 90% of all basic maintenance.
- Floor Pump with Gauge: Essential for setting correct tire pressure.
- Chain Lube (E-Bike Specific): Formulated to handle the high torque of a motor.
- Clean Rags: You will go through a lot of these.
- Hex Wrench Multi-Tool: A good one with 4mm, 5mm, and 6mm keys will cover most bolts.
- Bike-Specific Degreaser (Optional): For deep cleaning your chain.
- Chain Checker (Advanced): A simple $15 tool that tells you exactly when your chain is worn and needs to be replaced.
Safety, Warranty, and Compliance (Your Owner's Manual)
- Read Your Manual: Always consult your e-bike's owner's manual first. It is your primary guide for specific torque values, battery procedures, and unique features.
- Warranty: Performing basic maintenance like cleaning, lubing, inflating tires, and checking bolts will not void your warranty. This is considered normal owner upkeep.
- Warranty Warning: Modifying, opening, or tampering with the sealed electrical components (the motor case, the battery pack, the controller) almost certainly will void your warranty. This can also be extremely dangerous, posing a risk of electric shock or fire.
- Parts: Use manufacturer-approved or high-quality equivalent replacement parts (like brake pads or chains). Using incompatible parts can compromise safety and performance.
Cost of Maintenance: DIY vs. Pro Shop (ROI Model)
Investing in maintenance isn't a cost; it's a high-return investment in the life of your e-bike.
- Initial DIY Kit Cost: A basic kit (pump, lube, multi-tool) costs approximately $50 - $75.
- Pro-Shop "Basic Tune-Up" Cost: $75 - $125. (Typically includes brake/gear adjust, bolt check, light clean, lube).
- Pro-Shop "Full Tune-Up" Cost: $150 - $250. (Includes drivetrain deep clean, wheel truing, bearing checks, etc.).
Return on Maintenance (ROM) - The Real Value:
- Scenario 1 (Chain): A bottle of e-bike lube costs $15. A new chain, cassette, and chainring (a full drivetrain replacement) worn out by a gritty, un-lubed chain can cost $300 - $500. Your return on that $15 of lube is over 2,000%.
- Scenario 2 (Tires): A floor pump costs $40. A new tube costs $25 (plus the labor or headache of fixing it on the roadside). The pump pays for itself by preventing just two flats.
- Resale Value: A well-maintained e-bike with a clean service history and healthy battery report can retain 20-30% more resale value than a neglected one.
Common Mistakes & Quality Assurance (Pitfalls & Benchmarking)
Avoid these common pitfalls that can do more harm than good.
7 Common Mistakes to Avoid:
- Using WD-40 on your chain: Standard WD-40 is a solvent and degreaser, not a lubricant. It strips the chain of its internal factory grease and makes it get dirty faster.
- Using a high-pressure washer: This is the fastest way to destroy your e-bike. It forces water past protective seals and into bearings, motor internals, and electrical connections.
- Over-tightening bolts: This is just as bad as leaving them loose. Over-tightening can strip threads or crack expensive aluminum and carbon components. Snug is good; "cranked-down" is bad.
- Neglecting tire pressure: The #1 cause of poor range and pinch-flats.
- Forgetting to clean the chain: A gritty chain rapidly wears out your expensive cassette and chainring.
- Storing the battery at 0% or 100%: Storing at 0% can permanently damage its cells, making it unable to hold a charge. Storing at 100% accelerates long-term degradation.
- Ignoring squeaking brakes: This is a cry for help. It means your pads are either contaminated (oil/lube) or completely worn down to the metal.
Benchmarking Your Work (How to Check):
- Post-Lube Test: Your chain should be visually clean on the outside and sound almost silent when pedaling.
- Post-Brake-Check Test: Roll the bike and squeeze the brakes. The wheels should lock up firmly with no "mushy" feeling in the lever and no grinding/scraping sounds.
- Post-Cleaning Test: Spin the pedals and wheels. Everything should move freely with no grinding or rubbing.
- Post-Bolt-Check Test: Gently push and pull on your handlebars and seat. There should be no wiggling or play.
Troubleshooting Chain Noise
Is the noise a "squeak"?
  |
  +-- YES --> Your chain is dry.
  |           -> ACTION: Clean and lubricate the chain.
  |
  +-- NO --> Is the noise a "clink" or "click" when shifting?
          |
          +-- YES --> Your derailleur (gears) may be misaligned.
          |           -> ACTION: Seek professional gear tuning (indexing).
          |
          +-- NO --> Is the noise a "grind" or "rumble" from the pedals/motor?
                  |
                  +-- YES --> This could be a bearing issue (bottom bracket/motor).
                              -> ACTION: Seek professional help immediately.
Frequently Asked Questions (FAQ)
-
How often should I really clean my e-bike?
A quick wipe-down of the frame and chain after a wet or muddy ride is ideal. A deeper clean (including degreasing the drivetrain) should be done every 200-300 miles or at least once a month if you ride regularly. -
Is it safe to wash my e-bike with water?
Yes, gently. Use a standard garden hose on a "shower" or "mist" setting, or a bucket of soapy water. Focus on the frame and wheels. Avoid spraying water directly at the display, battery contacts, or motor hub. Never use a pressure washer. -
What's the single most important maintenance task?
Checking your tire pressure. It takes 30 seconds and impacts safety, battery range, and ride comfort all at once. -
How do I know when to replace my chain?
A bike shop has a "chain checker" tool that precisely measures "chain stretch." As a rule of thumb, if you ride regularly, have it checked every 6 months or 1,000 miles. Replacing a $30-$50 chain on time prevents you from having to replace a $300+ drivetrain (chain, cassette, and chainring) later. -
My brakes are squeaking, what do I do?
This usually means the pads or the disc rotor are contaminated (with oil, lube, or road grime) or the pads are worn out. First, try cleaning the disc rotor with rubbing alcohol and a clean rag. If the squeak persists, you likely need new brake pads.
Call to Action (CTA)
Your e-bike is a sophisticated, powerful machine, and these 10 tips will keep it that way. A well-maintained bike isn't just more reliable—it's safer, more efficient, and far more fun to ride. Don't wait for a squeak or a problem to appear. Protect your investment, grab your pump, and give your bike the 10-minute check-up it deserves today.
Ready to build your toolkit? Check out our curated e-bike maintenance kits and accessories in our store.
Sources (for reference):
- Deloitte (2022). Deloitte's 2023 TMT Predictions.
- Cycling Industry Report (2023). Annual Rider Satisfaction Survey.